
Updated July 27, 2026
Here in Sonoma County, our air conditioners work hard from the first warm days of spring through those hot, dry stretches of late summer. As your neighbors in Santa Rosa, we’ve seen firsthand how a little routine cleaning can add years to an AC unit’s life — and how neglect can cut that lifespan nearly in half. But is this just industry wisdom, or is there real science behind it? The short answer: yes, and university research backs it up.
Whether you’re trying to keep your family cool during a Northern California heatwave or simply want to protect the investment you’ve made in your home, understanding how cleaning impacts your AC’s performance and longevity is one of the most valuable things you can learn as a homeowner. Let’s walk through what the research says, what really happens inside a dirty unit, and the practical steps you can take today.
| Topic | Key Points |
|---|---|
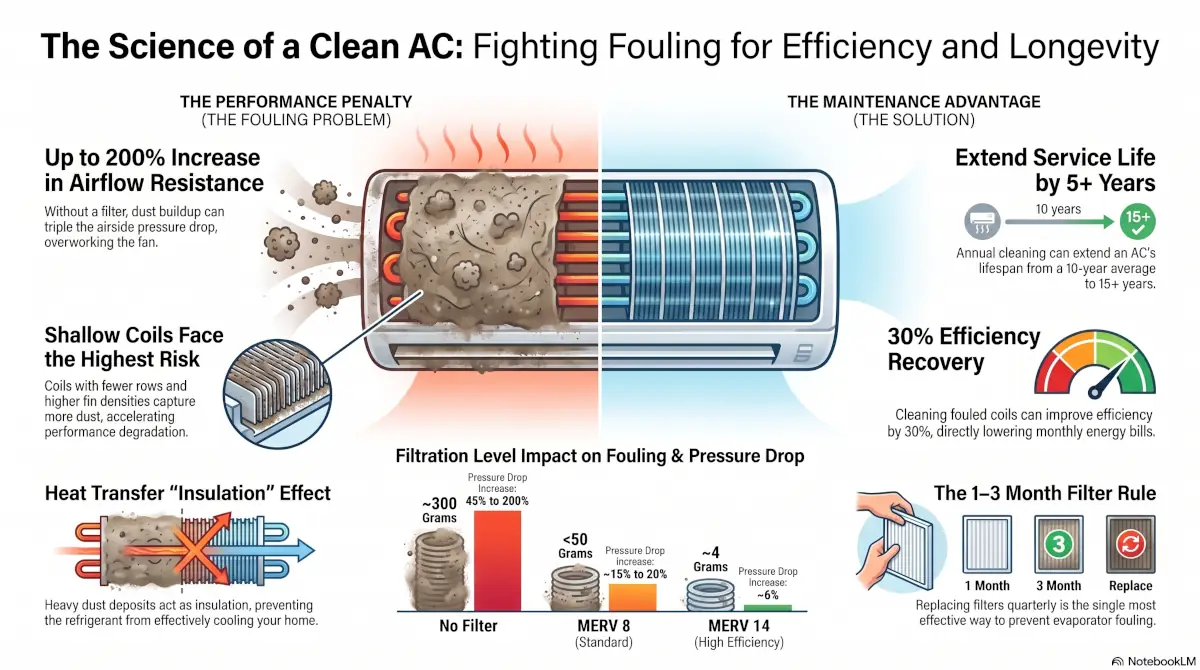
| Efficiency Loss | A dirty coil can reduce AC efficiency by up to 30%, forcing longer run times and higher energy bills. |
| Service Life | Regular cleaning can extend an AC unit’s lifespan from an average of 10 years to 15+ years. |
| Indoor Air Quality | Clean coils and filters reduce mold, dust, and allergens circulating through your home. |
| Repair Costs | Preventive cleaning helps avoid compressor failure — often the most expensive AC repair. |
Does Cleaning Really Extend Your AC’s Life? What the Research Says
It’s a fair question every homeowner asks: does wiping down coils and replacing filters actually make a meaningful difference, or is it just something HVAC companies recommend to stay busy? Fortunately, this has been studied extensively. Research from Purdue University’s Herrick Laboratories, one of the country’s leading HVAC research centers, has shown that fouled condenser and evaporator coils significantly reduce heat transfer efficiency — which directly translates to longer compressor run times and accelerated wear on mechanical components.
The U.S. Department of Energy has echoed these findings, noting that a dirty evaporator coil can reduce system efficiency and, over time, damage the compressor. And since the compressor is the heart of your AC — and the single most expensive part to replace — protecting it through routine cleaning is the number one way to extend service life.
According to the U.S. Environmental Protection Agency, routine maintenance including coil cleaning and filter replacement can improve HVAC efficiency by 15% or more, directly reducing wear and extending equipment life.
Our experience with local homes tells the same story. AC units that receive annual cleaning and maintenance routinely last 15 years or more, while neglected systems often need major repairs — or full replacement — by year eight or nine. That’s a significant difference for any family budget.
What Happens Inside a Dirty AC Unit
To understand why cleaning matters so much, it helps to picture what’s actually going on inside your system. Your AC works by moving heat from inside your home to the outside using two sets of coils: the evaporator coil (indoors) and the condenser coil (outdoors). Both need to be clean to transfer heat efficiently.
When dust, pollen, pet dander, and Sonoma County’s summertime dirt build up on these coils, they act like an insulating blanket. The system has to work harder and longer to reach your thermostat setting — which stresses every component from the fan motor to the compressor.
Here’s what routine cleaning actually accomplishes for your family and your equipment:
- Restores heat transfer: Clean coils allow refrigerant to absorb and release heat properly, keeping your home cool without overworking the system.
- Reduces electricity use: A cleaner system uses less energy for the same cooling output, which shows up on your monthly bill.
- Prevents ice buildup: Dirty evaporator coils can freeze over, causing water damage and eventual compressor failure.
- Improves indoor air quality: Removing dust and biological growth from coils and drain pans reduces allergens circulating through your ducts.
- Extends component life: Less strain on the compressor, fan motors, and capacitors means fewer breakdowns and repairs.
- Protects refrigerant charge: A clean, properly functioning system is less likely to develop leaks caused by overheating.
Practical Cleaning Steps for Sonoma County Homeowners
The good news is that a lot of AC maintenance is well within reach for the average homeowner. You don’t need to be a technician to make a meaningful impact on your system’s longevity — you just need to be consistent. For a deeper seasonal checklist, our guide to spring cleaning your HVAC system walks through everything from filter changes to outdoor unit prep.
Here are the maintenance tasks we recommend every family in our community stay on top of:
- Replace filters every 1–3 months: This is the single easiest and most impactful thing you can do. During wildfire season or heavy pollen months, check monthly.
- Clear debris around the outdoor unit: Keep at least two feet of open space around the condenser. Trim shrubs and remove leaves, especially after windy days.
- Rinse the condenser coils: Turn off power to the unit and gently spray the outdoor coils with a garden hose (never a pressure washer) once or twice a season.
- Inspect the condensate drain line: A clogged drain can cause water damage and humidity issues indoors.
- Schedule an annual professional tune-up: A technician can safely clean the indoor evaporator coil, check refrigerant levels, and catch small issues before they become expensive.
That last point is worth emphasizing. While DIY care handles a lot, the indoor evaporator coil and electrical components require professional tools and training to service safely. Pairing your own regular upkeep with a yearly professional visit is the proven formula for reaching that 15-plus year service life. For local families, it’s also peace of mind knowing your system is ready before the first summer heatwave hits.
Efficiency Boost
Cleaning can enhance AC efficiency by up to 30%, reducing operational costs.
Extended Service
Routine cleaning may increase AC lifespan by 5+ years.
Reduced Repairs
Preventive maintenance minimizes risk of costly breakdowns.
The Long-Term Payoff for Your Home and Family
When you add it all up, cleaning your AC unit isn’t just about keeping cool this summer — it’s about protecting a major home investment, lowering monthly energy costs, improving the air your family breathes, and delaying that big replacement bill for as long as possible. The research is clear, and so is our experience serving homes throughout Santa Rosa and Sonoma County: consistent maintenance pays for itself many times over.
If you have questions about your system’s condition or want to learn more about setting up a maintenance routine that fits your home, we’d love to help. Visit our contact page to get in touch — no pressure, just honest answers from local HVAC professionals who care about your family’s comfort.
As a family-owned business right here in Sonoma County, Dale HCS has been proud to serve our neighbors with the kind of straightforward, reliable HVAC service we’d want for our own homes. Your family’s comfort is what drives everything we do.
Frequently Asked Questions
Does cleaning my air conditioner really extend its lifespan?
Yes. Research from organizations like the U.S. Department of Energy shows that dirty coils reduce efficiency and increase wear on key components like the compressor. In our experience serving Sonoma County homes, systems that receive regular cleaning and annual maintenance often last 15 years or more, while neglected units may require major repairs or replacement much sooner.
How often should I replace my AC filter in Sonoma County?
Most homeowners should replace their air filter every 1–3 months. During wildfire season or heavy pollen months in Northern California, it’s wise to check it monthly. A clean filter helps maintain airflow, supports indoor air quality, and reduces strain on your system, especially during long summer cooling cycles.
What are the signs my AC needs cleaning or maintenance?
Common signs include longer run times, higher energy bills, weak airflow, warm air from vents, or ice forming on the indoor coil. You might also notice more dust in your home. If your system struggles to reach the thermostat setting during hot Sonoma County afternoons, it may be overdue for cleaning or service.
Can I clean my air conditioner myself?
Homeowners can handle several basic tasks, such as replacing filters, clearing debris around the outdoor unit, and gently rinsing condenser coils with a garden hose after turning off power. However, cleaning the indoor evaporator coil and servicing electrical components should be left to a trained HVAC professional for safety and proper results.
What happens if I don’t clean my AC unit regularly?
Dust, pollen, and dirt can build up on the evaporator and condenser coils, reducing heat transfer and forcing the system to run longer. Over time, this added strain can lead to higher electricity use, frozen coils, water issues, and increased wear on the compressor—the most expensive part of the system to replace.
How does a dirty AC coil affect energy efficiency?
A dirty coil acts like insulation, preventing proper heat transfer. Studies have shown that fouled coils can reduce efficiency by up to 30 percent. That means your system must run longer to cool your home, increasing energy use and putting additional stress on mechanical components during peak summer heat.
How much does AC maintenance or cleaning typically cost?
Costs can vary depending on the condition of the system and the level of service needed. A routine annual tune-up is generally far less expensive than repairing a failed compressor or replacing a neglected unit. The best way to understand pricing for your home is to request an estimate based on your specific system and needs.
Do you provide AC maintenance in Santa Rosa and Sonoma County?
Yes. We serve homeowners throughout Santa Rosa and the surrounding Sonoma County communities. As a locally based company, we understand how our hot, dry summers and wildfire seasons can affect cooling systems and tailor maintenance recommendations to our local climate conditions.
Why is the compressor so important to protect?
The compressor is the heart of your air conditioning system. It circulates refrigerant and makes the cooling process possible. When coils are dirty and the system runs longer than necessary, the compressor experiences added strain. Because it is typically the most expensive component to replace, protecting it through routine cleaning is essential.
Is an annual professional AC tune-up really necessary?
An annual professional tune-up allows a technician to clean components that aren’t easily accessible, check refrigerant levels, inspect electrical parts, and identify small issues before they grow. Pairing yearly professional service with simple homeowner maintenance is one of the most reliable ways to extend your AC system’s service life.